どうも、プログラマーの泥ネコです。
今回は、以下のような方に向けて執筆しました。
よろしくお願いします。
■こんな人向け
・UnityAIでDETRを動かしてみたい
・Hugging Faceの内部処理を覗いてみたい
・主にPythonのコード解説がメインです (Pythonをある程度触っている方向けの説明になっています)
・物体検知の触りを知っていると分かりやすいかもしれません
■枕話
私は散歩中、お気に入りのカメラで風景を撮ることがあるのですが、皆さんも「写り込んだ人影が怪しいかどうか」
を確認したいタイミングがよくあると思います。私にもあります。
写真に何が写っているかを調べる技術といえば「画像認識」「物体検知(Object Detection)」ですが、
調べたい対象を「犬か猫か」で分類するのであれば公開されているデータセットや、
それでチューニングされたモデルを使えば解決できます。
しかし、「写った人が怪しいかどうか」を調べるモデルについては知見がありません。困りました。
ですが、ご安心を。世の中には「ファインチューニング」なる技法があり、検出する対象を自分で好きなように選べるのです。
ひとまず「写った人の怪しさ」については「マスク」と「眼鏡」の有無で判別することにしましょう。
(※特段筆者に「マスクとサングラスの人」への偏見はありません。むしろ筆者の標準装備です。)
■今回達成したい内容
さて、ここで今回やりたいこと、達成したい目標について定義しておきます。
---------------------------------------------------------------------------------------------------------------------------------------
・DETRで自前モデルを使って物体検知をやってみる
・ 最終的にはUnityへの組み込みを目指す
機械学習と言えばPythonだが、アプリ作成と言えばやっぱりUnity
・ ベースは「microsoft/conditional-detr-resnet-50」を使用
Apache2.0ライセンスなので、アプリへの組み込みが気楽
Hugging Faceのエンジニアの一人であるNielsRogge氏が作成したファインチューニング用の指南書がある
Fine_tuning_Conditional_DETR_on_custom_dataset_(balloon).ipynb
---------------------------------------------------------------------------------------------------------------------------------------
今回は、ファインチューニングの解説については割愛、てんやわんや四苦八苦ありまして、
無事「マスクとサングラスを検出する、ファインチューニングされた物体検知モデル」を手に入れたことにします。
さて、このモデルをUnity上で動かしたいのですが、どうすれば良いのでしょうか?
こういう時は、「元々動いていたものを移植する」という手法で試してみましょう。
■小話:transformersとDETRについて知る
DETRとは「DEtection TRansformer」の略で、意訳すると「Transformerの技術を用いた物体検知」。
Transformerとは、「Attention」なる技術を使って精度を向上させた機械学習モデルの一種で、自然言語処理(NLP)に強いモデルです。
-文章の翻訳で使う場合、とある単語が入力文中のどの部分と関連性が高いかをスコアとして計算したりする。
DETRにおけるAttentionは「画像内で認識されたオブジェクト(犬とかペンとか)において、
『一緒に写っているオブジェクトは近しい関係のオブジェクトだろう』という予測を立てて検知する」ということに使われます。
■閑話休題、いざ実行
機械学習ではおなじみPythonから、transformersを利用して実行するのがお手軽です。
https://huggingface.co/microsoft/conditional-detr-resnet-50
ここでfrom_pretrained(path)の引数を、ローカルの「ファインチューニング済みモデルのディレクトリパス」
にすると、用意したモデルで推論できます。
■Unityに移植するためには?
Unityでモデルを使うためには、Pythonで使っているモデルをUnityで使える形式にしなければなりません。
・Unityでよく使う形式は「ONNX」なので、「Pythonで読めるデータ」を「ONNX」に変換したい。
・PyTorchの場合は「torch.onnx.export」でONNX形式に出力できます。
import torch
from transformers import AutoModelForObjectDetection

# モデルのアーキテクチャを定義
model = AutoModelForObjectDetection.from_pretrained("microsoft/conditional-detr-resnet-50",
                                                    id2label={0:"Face Mask", 1:"Glasses"}, # マスクとメガネ
                                                    label2id={"Face Mask":0, "Glasses":1}, # マスクとメガネ
                                                    ignore_mismatched_sizes=True)
model_path = 'test_model.pth'   # モデルの保存先パス
load = torch.load(model_path)
model.load_state_dict(load)

# 推論モードに設定
model.eval()

# ダミー入力の作成
dummy_input = torch.randn(1, 3, 800, 1333)  # バッチサイズ1、3チャネル、横1333x縦800ピクセルの画像

# ONNX ファイルにエクスポート
torch.onnx.export(model,               # モデル
                  dummy_input,         # モデルへのダミー入力
                  "test_model.onnx",   # 出力するファイル名
                  export_params=True,  # モデルファイルに学習済みパラメータを含むかどうか
                  #opset_version=11,    # 使用する ONNX のバージョン
                  #do_constant_folding=True,  # 最適化オプション、定数を事前計算
                  output_names=['logits', 'pred_boxes', 'last_hidden_state', 'encoder_last_hidden_state'], # 出力名
)
UnityAIではONNXをサポートしているので、これでpython/transformersと同じように推論ができる、はずなのですが・・・
「同じ画像を入れているのに、モデルに入れる前のテンソルの中身が違わない?」
■何故UnityとPythonで違うテンソルになる?
「画像をテンソルに変換する機能」はpython側transformersでは「各モデル専用の変換処理」が使われています。
image_processor = DetrImageProcessor.from_pretrained("microsoft/conditional-detr-resnet-50")Unityで使われる「TextureConverter.ToTensor」は機械的に画像を「NCHW」形式に変換するだけなので、
ONNXに入れる前に前処理が必要になります。
どうやらここでtransformersの「DetrImageProcessor.from_pretrained」を読み解く必要があるようです。
幸いなことにHugging Faceはオープンソースなので、GitHubを介してソースコードを確認できます。
(GitHubのconditional_detrディレクトリ)
■from_pretrainedって何者?
「from_pretrained」という関数は、transformersに用意されている関数の1つで、同名の関数がライブラリ内に頻出します。
どの関数もイメージとしては「引数のモデル名に合ったクラスや関数を返す」というものです。
DetrImageProcessorのfrom_pretrainedは、各モデルに応じた「ImageProcessor」と
呼ばれる画像をテンソル化するクラスを返してくれます。
一般的には「preprocessor_config.json」内の「image_processor_type」に記載のクラスが使われ、
結果、「microsoft/conditional-detr-resnet-50」の場合はConditionalDetrImageProcessorクラスが返されるようです。
この時、各種変数として「preprocessor_config.json」記載の値が追加(置き換え)されます。
例えば「リサイズや正規化が必要かのフラグ」「入力画像サイズ」「色表現を正規化するための変数」などです。
画像をテンソル化する処理は、返り値である「ConditionalDetrImageProcessor」の「preprocess」関数が利用されます。
preprocessor_config.json
{
  "do_normalize": true,
  "do_resize": true,
  "image_processor_type": "ConditionalDetrImageProcessor",
  "format": "coco_detection",
  "image_mean": [
    0.485,
    0.456,
    0.406
  ],
  "image_std": [
    0.229,
    0.224,
    0.225
  ],
  "size": {"shortest_edge": 800, "longest_edge": 1333}
}
■ConditionalDetrImageProcessorが画像をテンソル化するまで
「transformers」では複数の画像を一度に処理することを想定しますが、今回は「UnityAI/ONNX」
に持ってくる想定として一枚ずつ処理することとします。
ONNX生成時に学習は終わっているので、目的は推論のみ。なので今回はPanopticなどのマスクは使いません。
入力画像の前処理関数、「ConditionalDetrImageProcessor.preprocess」の処理は大まかに
1.「resize:画像サイズ調整」
2.「rescale:RGB表現方法調整」
3.「normalize:RGBの正規化」
4.「pad:不足部分の補修」
の順で処理されます。
ただし、前項のfrom_pretrainedで読まれた「preprocessor_config.json」内の「do_resize」「do_rescale」「do_normalize」
のフラグ次第ではそれぞれの処理がスキップされます。
■resize:画像サイズ調整
def resize(
    image: np.ndarray,
    size: tuple[int, int],
    resample: Optional["PILImageResampling"] = None,
    reducing_gap: Optional[int] = None,
    data_format: Optional[ChannelDimension] = None,
    return_numpy: bool = True,
    input_data_format: Optional[Union[str, ChannelDimension]] = None,
) -> np.ndarray:


do_rescale = False
if not isinstance(image, PIL.Image.Image):
        do_rescale = _rescale_for_pil_conversion(image)
        image = to_pil_image(image, do_rescale=do_rescale, input_data_format=input_data_format)
height, width = size

resized_image = image.resize((width, height), resample=resample,
reducing_gap=reducing_gap)

if return_numpy:
        resized_image = np.array(resized_image)
        resized_image = np.expand_dims(resized_image, axis=-1) if resized_image.ndim == 2 else resized_image
        resized_image = rescale(resized_image, 1 / 255) if do_rescale else resized_image
return resized_image
resize後のサイズは、「preprocessor_config.json」内の「size」の記載によって決められます。
"size": {"shortest_edge": 800, "longest_edge": 1333} リサイズ処理は
1.「一旦テンソルをPIL.Image化」(元からPIL.Imageだった場合はそのまま流用)
2.「PIL.Image.resizeでリサイズ」
3.「NumPy.arrayで再びテンソル化」
の順で行われます。
リサイズ処理をPIL(Pillow)に任せているので、UnityではRenderTextureやGraphics.ConvertTextureなどを
使ってリサイズすることになりそうです。
引数の「return_numpy: bool」がFalseの場合はPIL.Imageのまま返るようですが、
ConditionalDetrImageProcessor.resizeのデフォルト値はTrueになっています。
この時に各ピクセルのカラー情報を読み取り、「カラー情報が『0~1のfloat』で表現されているならrescale済みにしておく」
という処理も入っています。「intで0~255」「floatで0~1」のどちらかでない場合はValueErrorが投げられます。
■rescale:RGB表現方法調整
def rescale(
    image: np.ndarray,
    rescale_factor: float,
    data_format: Optional[Union[str, ChannelDimension]] = None,
    input_data_format: Optional[Union[str, ChannelDimension]] = None,
) -> np.ndarray:

    dtype: np.dtype = np.float32
    rescaled_image = image.astype(np.float64) * rescale_factor
    if data_format is not None:
        rescaled_image = to_channel_dimension_format(rescaled_image, data_format, input_data_format)

    rescaled_image = rescaled_image.astype(dtype)
    return rescaled_image
rescaleで行われている処理は
rescaled_image = image.astype(np.float64) * scaleの一文だけ、と言っても良いでしょう。
scaleはデフォルトの場合、クラスで設定されているもの(ConditionalDetrImageProcessorの場合は『1/255』)が使われます。
def __init__(
...
    rescale_factor: Union[int, float] = 1 / 255,
...
次のnormalizeに向けて、「0~255」で表現されたRGB表現を「0~1」に変換するための処理で、
内容としてはテンソル内の各値に「1/255」を掛けていくだけです。
astypeを使ってrescale中はfloat64で演算し、処理後はfloat32に戻しているようです。
UnityでTextureConverter.ToTensorを使うと、あらかじめColor構造体のRGBと同じ
「0~1」の表現になっているので、Unityに移植する際は不要な処理ですね。
■normalize:RGBの正規化
def normalize(
    image: np.ndarray,
    mean: Union[float, Collection[float]],
    std: Union[float, Collection[float]],
    data_format: Optional[ChannelDimension] = None,
    input_data_format: Optional[Union[str, ChannelDimension]] = None,
) -> np.ndarray:

    mean = np.array(mean, dtype=image.dtype)
    std = np.array(std, dtype=image.dtype)

    if input_data_format == ChannelDimension.LAST:
        image = (image - mean) / std
    else:
        image = ((image.T - mean) / std).T

    image = to_channel_dimension_format(image, data_format, input_data_format) if data_format is not None else image
    return image
rescaleで「0~1」に整えられたRGB値を、モデルが「学習時に処理していた形」に"ならす"ための処理です。
学習時と推論時の環境を統一させるため、入力した画像の範囲を「学習時の画像の特徴量の平均」に変換しています。
各値に対して「平均:mean」を引いてから「標準偏差:std」で割ることで、「中心0かつ分散1」のデータ群にしているようです。
あくまで分散1なので、実際の値が「-1~1」に丸められるわけではありません。
学習時のデータセット全体のピクセルごとの平均値・標準偏差で正規化することで、
「学習時に調整した答えから外れた推論」にならないようにするための処理、と言えますね。
■pad:不足部分の補修
def pad_base(
    image: np.ndarray,
    padding: Union[int, tuple[int, int], Iterable[tuple[int, int]]],
    mode: PaddingMode = PaddingMode.CONSTANT,
    constant_values: Union[float, Iterable[float]] = 0.0,
    data_format: Optional[Union[str, ChannelDimension]] = None,
    input_data_format: Optional[Union[str, ChannelDimension]] = None,
) -> np.ndarray:
    if input_data_format is None:
        input_data_format = infer_channel_dimension_format(image)

image = np.pad(image, padding, mode="constant", constant_values=constant_values)
image = to_channel_dimension_format(image, data_format, input_data_format) if data_format is not None else image
    return image
transformersでは複数枚の画像を1回のバッチで推論する際、全ての画像の縦横比が一致していない場合があります。
この時に縦横比を合わせるため、「np.pad」でpaddingを行います。
np.padは0埋めのため、存在しない領域は0で埋められます。
(np.padの処理についてはkuroitu S氏のnumpy.pad関数完全理解 - Qiitaが分かりやすいです。)
この時、padding後の画像テンソルは「BatchFeature」という辞書クラスの
「pixel_values」に入れられて返ってくるようですが、
Unity×ONNX推論の場合1枚ずつの推論になるので、BatchFeatureは不要です。
ただし、モデルに処理後のテンソルを入れる前にテンソルのshapeを
合わせる必要があるので、padding処理そのものは必要になります。
■いざONNX推論!
さて、各種関数が出そろいましたので、これらを組み立てた後、UnityAIが用意しているWorkerに
入れるだけで簡単に結果が出てきます。
logits=
 tensor([[
        [-3.9726, -4.0415, -3.6675, -3.9858],
        [-3.8928, -3.9577, -3.7421, -4.1305],
        [-3.9446, -4.0710, -3.7635, -4.0328],
         ...,
        [-3.9693, -4.0834, -3.7298, -4.0377],
        [-3.8276, -4.0341, -3.7585, -3.9589]
    ]]
 )
pred_boxes=
 tensor([[
        [0.8039, 0.6546, 0.1550, 0.4250],
        [0.5603, 0.0701, 0.1168, 0.1836],
        [0.9051, 0.4688, 0.1033, 0.3281],
         ...,
        [0.8860, 0.4282, 0.1307, 0.4112],
        [0.0160, 0.2634, 0.0371, 0.3531]
    ]]
 )
.......
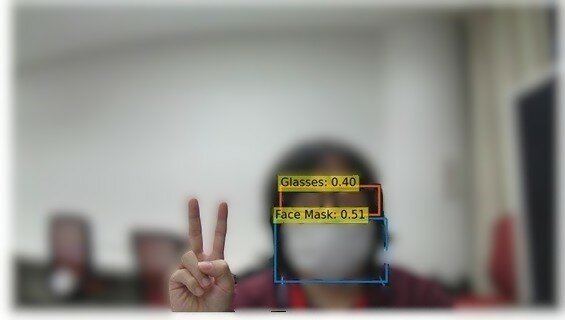
ついに写真に何が写っているかが分かるようになりましたね!
「......で、この数値をどうすればいいの?」
■出力されたTensor
まずはPython側に立ち戻ってみましょう。そもそもtransformersではどうしているのでしょうか?
transformersでは、ImageProcessor.post_process_object_detectionに「モデルから出力された結果」と「入力する画像サイズ」
を引数として渡すだけで加工後のデータが出てきます。
outputs = model(pixel_values=pixel_values, pixel_mask=None)
target_sizes = torch.tensor(image.size[::-1]).unsqueeze(0)
# processorは前回使ったImageProcessorと同じ
results = processor.post_process_object_detection(outputs, target_sizes=target_sizes, threshold=0.9)
Unityでは同じ処理を使えないので、改めて「ConditionalDetrImageProcessor」を読み解く必要があるようです。
■ConditionalDetrImageProcessorが推論結果を取り出すまで
実際に「ConditionalDetrImageProcessor.post_process_object_detection」の内容を一行ずつ読み解いてみましょう。
def post_process_object_detection(
        self, outputs, threshold: float = 0.5, target_sizes: Union[TensorType, list[tuple]] = None, top_k: int = 100
    ):
    out_logits, out_bbox = outputs.logits, outputs.pred_boxes

    prob = out_logits.sigmoid()
    prob = prob.view(out_logits.shape[0], -1)
    k_value = min(top_k, prob.size(1))
    topk_values, topk_indexes = torch.topk(prob, k_value, dim=1)
    scores = topk_values
    topk_boxes = torch.div(topk_indexes, out_logits.shape[2], rounding_mode="floor")
    labels = topk_indexes % out_logits.shape[2]
    boxes = center_to_corners_format(out_bbox)
    boxes = torch.gather(boxes, 1, topk_boxes.unsqueeze(-1).repeat(1, 1, 4))

    if target_sizes is not None:
        if isinstance(target_sizes, list):
            img_h = torch.Tensor([i[0] for i in target_sizes])
            img_w = torch.Tensor([i[1] for i in target_sizes])
        else:
            img_h, img_w = target_sizes.unbind(1)
        scale_fct = torch.stack([img_w, img_h, img_w, img_h], dim=1).to(boxes.device)
        boxes = boxes * scale_fct[:, None, :]

    results = []
    for s, l, b in zip(scores, labels, boxes):
        score = s[s > threshold]
        label = l[s > threshold]
        box = b[s > threshold]
        results.append({"scores": score, "labels": label, "boxes": box})

    return results
out_logits, out_bbox = outputs.logits, outputs.pred_boxes今回利用する「conditional-detr-resnet-50」のoutputは 「logits」「pred_boxes」「last_hidden_state」「encoder_last_hidden_state」
の4つのテンソルですが、実際に使うのはlogitsとpred_boxesの2つだけです。
last_hidden_stateとencoder_last_hidden_stateは、どちらも「推論結果そのもの」というより
「内部でどういう推論をしていたか」を見るための特徴ベクトルで、
推論の可視化や転移学習時に使うらしいですが、今回は使わないようです。
out_logitsは[バッチ数-検出スロット数-ラベル数]の3次元テンソルで、各値は検出スコアが入っています。
なお、「ラベル数」は「検出したいラベル」の数に「検出無し」が混ぜられているので、
「実際のラベルの数+1」の数値になります。
ちなみにpred_boxesは[バッチ数-検出スロット数-XYHW]の3次元テンソルです。
prob = out_logits.sigmoid()
prob = prob.view(out_logits.shape[0], -1)
「out_logits」にsigmoid関数を通したのちにview関数で1つの列ベクトルにまとめています。
sigmoid関数とは「値が大きいものは1に、小さいものは0に近づく」「出力は0~1の間」という特徴を持つ単調増加の関数で、
機械学習では活性化関数としてよく用いられる関数です。
(sigmoid関数については渡邊琢資氏のシグモイド関数とは?- Qiitaが大変分かりやすいです。)
この関数を通すことでout_logitsの値を「0~1の確率っぽい値」にしつつ、
後々「検出できたもの」「検出できなかったもの」の区別がつけやすくなります。
この後すぐ、top_kでスコア上位k個を取るため、1列にまとめているようです。
k_value = min(top_k, prob.size(1))
topk_values, topk_indexes = torch.topk(prob, k_value, dim=1)
scores = topk_values
torch.topk関数を使って「out_logitsのうち、上位k個を検出結果として取得する」という処理をしています。
取得したtopk_valuesがそのまま信頼度(scores)となります。
前の行でsigmoid関数を通しましたが、sigmoidは単調増加なのでtop_kの順位には影響しません。
topk_boxes = torch.div(topk_indexes, out_logits.shape[2], rounding_mode="floor")
labels = topk_indexes % out_logits.shape[2]
以前、probをtop_k用に1列に纏めたので、出力結果の正しい参照indexは
「top_kで取得したindex/ラベル数」になります。
topk_boxesは「topk_indexes / ラベル数」で「スロットインデックス」を、
labelsは「topk_indexes % ラベル数」で「ラベルインデックス」を取り出しています。
boxes = center_to_corners_format(out_bbox)
boxes = torch.gather(boxes, 1, topk_boxes.unsqueeze(-1).repeat(1, 1, 4))
bounding_boxの結果は「中心X, 中心Y, 幅, 高さ」で返ってくるので、
これを「左上X, 左上Y, 右下X, 右下Y」のフォーマットに変換しています。
補正後、topkの結果の対となるBoundingBoxを取得しています。
ここでの「topk_boxes.unsqueeze(-1).repeat(1, 1, 4)」は「1列になったtopk_boxesをrepeatを使って3次元に戻しつつ、
『Rect』を参照するための形に整える」ための処理です。
これにより、元々検出結果のRectが入っていたboxesから、「top_kで返ってきた値のRect」を取得することができます。
if target_sizes is not None:
    if isinstance(target_sizes, list):
        img_h = torch.Tensor([i[0] for i in target_sizes])
        img_w = torch.Tensor([i[1] for i in target_sizes])
    else:
        img_h, img_w = target_sizes.unbind(1)
    scale_fct = torch.stack([img_w, img_h, img_w, img_h], dim=1).to(boxes.device)
    boxes = boxes * scale_fct[:, None, :]
target_sizesが指定されている場合、「0~1のboxes」に「widthとheight」を掛けることで、
「実際の画像上のどの位置か?」に変換しています。
results = []
for s, l, b in zip(scores, labels, boxes):
    score = s[s > threshold]
    label = l[s > threshold]
    box = b[s > threshold]
    results.append({"scores": score, "labels": label, "boxes": box})
さて、いよいよresultsです。
ここでは信頼度(scores)がthreshold以上のものをピックアップして推論結果としています。
scoresには先ほどsigmoid関数を掛けて0~1に整えられているため、境界を引きやすくなっています。
これで「検出されたオブジェクトと、その位置と信頼度」が分かりやすく取得できるようになりました!
これまでの処理をC#に移植すればUnity/ONNXでもDETRが回せます!
これにて無事、"自分が映っている写真"を見分けることができるようになりました。
これで目標達成です!
ふだん、仕事で使っていることとは違う使い方もできるという参考になればと思います。
ぜひ実装してみてください。
今回は、以上となります。
■おまけ Unity-C#のコード全文
これまでの過程をまとめましたので、参考にどうぞ。
using System.Collections.Generic;
using Unity.InferenceEngine;
using UnityEngine;
using UnityEngine.InputSystem;

public class ONNXTest : MonoBehaviour
{
    public class sDetectorResult
    {
        public float score;
        public int label;
        public float[] box = new float[4];
    }

    [SerializeField]
    Texture2D sampleTexture;
    [SerializeField]
    ModelAsset modelAsset;

    Worker onnxWorker;

    void Start()
    {
        Model runtimeModel = ModelLoader.Load(modelAsset);
        onnxWorker = new(runtimeModel, BackendType.CPU);
    }

    void Update()
    {
        if (Keyboard.current.spaceKey.wasPressedThisFrame)
        {
            Detected(sampleTexture);
        }
    }

    private void Detected(Texture2D image)
    {
        // ConditionalDetrImageProcessor.preprocess
        var prepro_tensor = preprocess(image);

        onnxWorker.Schedule(prepro_tensor);

        // ConditionalDetrImageProcessor.post_process_object_detection
        var results = post_process_object_detection(onnxWorker);
        foreach (var result in results)
        {
            Debug.Log($"[{result.label}] score:{result.score}");
        }
        prepro_tensor.Dispose();
    }


    // ConditionalDetrImageProcessor.preprocess

    Tensor<float> preprocess(Texture2D texture)
    {
        //! サイズ取得
        var (new_x, new_y) = get_resize_output_image_size(texture);

        //! テンソル化前にresizeとpaddingを済ませる
        var new_texture = resize(texture, new_x, new_y);
        new_texture.wrapMode = TextureWrapMode.Clamp;       //!< UnityはClampにしておかないと端が汚れる

        //! テンソル化
        var image = new Tensor<float>(new TensorShape(1, 3, new_texture.height, new_texture.width));
        TextureConverter.ToTensor(new_texture, image);  //!< BCHW形式 ChannelDimension.FIRST
        var read_image = image.ReadbackAndClone();
        image.Dispose();

        //! normalize
        read_image = normalize(read_image);

        return read_image;
    }

    RenderTexture resize(Texture2D image, int new_width, int new_height)
    {
        //! 一旦元画像をリサイズ
        RenderTexture resizedRT = RenderTexture.GetTemporary(new_width, new_height, 0);
        Graphics.Blit(image, resizedRT);

        //! 1333x800にpaddingするための黒いRenderTextureを作成
        RenderTexture paddedRT = RenderTexture.GetTemporary(LONGEST_EDGE, SHORTEST_EDGE, 0);
        //! 黒で塗りつぶし
        RenderTexture.active = paddedRT;
        GL.Clear(true, true, Color.black);

        //! 左上詰めでコピー
        GL.PushMatrix();
        GL.LoadPixelMatrix(0, LONGEST_EDGE, SHORTEST_EDGE, 0);
        Graphics.DrawTexture(new Rect(0, 0, new_width, new_height), resizedRT);
        GL.PopMatrix();

        //! 後始末
        RenderTexture.active = null;

        return paddedRT;
    }

    const int SHORTEST_EDGE = 800;
    const int LONGEST_EDGE = 1333;
    (int x, int y) get_resize_output_image_size(Texture image)
    {
        int width = image.width;
        int height = image.height;
        float? raw_size = null;
        float min_original_size = Mathf.Min(height, width);
        float max_original_size = Mathf.Max(height, width);
        int size = SHORTEST_EDGE;

        if (max_original_size / min_original_size * SHORTEST_EDGE > LONGEST_EDGE)
        {
            //! はみでていたらLONGEST_EDGE基準でリサイズ
            raw_size = LONGEST_EDGE * min_original_size / max_original_size;
            size = Mathf.RoundToInt(raw_size.Value);
        }

        if ((height <= width && height == size) || (width <= height && width == size))
        {
            //! 既に目的サイズ
            return (width, height);
        }
        else if (width < height)
        {
            //! 短辺のwidthが基準
            float chk_size = (raw_size != null ? raw_size.Value : size);
            height = Mathf.RoundToInt(chk_size * height / width);
            width = size;
        }
        else
        {
            //! 短辺のheightが基準
            float chk_size = (raw_size != null ? raw_size.Value : size);
            width = Mathf.RoundToInt(chk_size * width / height);
            height = size;
        }

        return (width, height);
    }

    float[] IMAGENET_DEFAULT_MEAN = new[] { 0.485f, 0.456f, 0.406f }; //!< 画像正規化平均
    float[] IMAGENET_DEFAULT_STD = new[] { 0.229f, 0.224f, 0.225f };  //!< 画像正規化標準偏差
    Tensor<float> normalize(Tensor<float> image)
    {
        for (int n1 = 0; n1 < image.shape[1]; n1++)
        {
            for (int n2 = 0; n2 < image.shape[2]; n2++)
            {
                for (int n3 = 0; n3 < image.shape[3]; n3++)
                {
                    //! 0次元目はバッチサイズなので固定
                    image[0, n1, n2, n3] = (image[0, n1, n2, n3] - IMAGENET_DEFAULT_MEAN[n1]) / IMAGENET_DEFAULT_STD[n1];
                }
            }
        }
        return image;
    }


    // ConditionalDetrImageProcessor.post_process_object_detection

    private void center_to_corners_format(ref Tensor<float> x)
    {
        // xywh -> xyxy
        float x_c, y_c, w, h;
        for (int i = 0; i < x.shape[1]; i++)
        {
            x_c = x[0, i, 0];
            y_c = x[0, i, 1];
            w = x[0, i, 2];
            h = x[0, i, 3];
            x[0, i, 0] = (x_c - 0.5f * w);
            x[0, i, 1] = (y_c - 0.5f * h);
            x[0, i, 2] = (x_c + 0.5f * w);
            x[0, i, 3] = (y_c + 0.5f * h);
        }
    }

    private List<sDetectorResult> post_process_object_detection(Worker onnx_worker, float threshold = 0.5f, Vector2? target_sizes = null, int top_k = 100)
    {
        int no1;

        //! logitsとbboxを取得
        var peek_logits = onnx_worker.PeekOutput("logits") as Tensor<float>;
        var peek_bbox = onnx_worker.PeekOutput("pred_boxes") as Tensor<float>;
        var out_logits = peek_logits.ReadbackAndClone();
        var out_bbox = peek_bbox.ReadbackAndClone();
        peek_logits.Dispose();
        peek_bbox.Dispose();

        //! logitsをSigmoid関数に通す
        for (no1 = 0; no1 < out_logits.shape.length; no1++)
        {
            out_logits[no1] = 1 / (1 + Mathf.Exp(-out_logits[no1]));
        }

        //! 上位top_kを抽出
        var prob = out_logits.DownloadToArray();
        var k_value = Mathf.Min(top_k, prob.Length);
        List<float> scores = new (k_value);
        List<int> topk_boxes = new (k_value);
        List<int> labels = new (k_value);
        for (no1 = 0; no1 < k_value; no1++)
        {
            float max_val = float.MinValue;
            int max_idx = -1;
            for (int i = 0; i < prob.Length; i++)
            {
                if (prob[i] > max_val)
                {
                    max_val = prob[i];
                    max_idx = i;
                }
            }
            scores.Add(max_val);
            topk_boxes.Add(Mathf.FloorToInt(max_idx / out_logits.shape[2]));
            labels.Add(max_idx % out_logits.shape[2]);

            prob[max_idx] = float.MinValue; //!< 一度選んだ要素は除外する
        }

        //! xywh形式をxyxy形式に変換
        center_to_corners_format(ref out_bbox);
        List<float[]> box = new List<float[]>(k_value);
        for (no1 = 0; no1 < k_value; no1++)
        {
            float[] b = new float[4]
            {
                out_bbox[0, topk_boxes[no1], 0],
                out_bbox[0, topk_boxes[no1], 1],
                out_bbox[0, topk_boxes[no1], 2],
                out_bbox[0, topk_boxes[no1], 3],
            };
            box.Add(b);
        }
        //! target_sizesに合わせてスケーリング
        if (target_sizes != null)
        {
            for(no1 = 0; no1 < box.Count; no1++)
            {
                box[no1][0] *= target_sizes.Value.x;
                box[no1][1] *= target_sizes.Value.y;
                box[no1][2] *= target_sizes.Value.x;
                box[no1][3] *= target_sizes.Value.y;
            }
        }

        //! 信頼度が閾値以上のものをresultsとする
        var results = new List<sDetectorResult>();
        for (no1 = 0; no1 < k_value; no1++)
        {
            if (scores[no1] <= threshold) continue;

            var result = new sDetectorResult();
            result.score = scores[no1];
            result.label = labels[no1];
            result.box = new float[4]
            {
                box[no1][0],
                box[no1][1],
                box[no1][2],
                box[no1][3],
            };
            results.Add(result);
        }
        return results;
    }
}
※免責事項:本記事の内容(コード/手順)は自己責任でご利用ください。
本記事の内容を利用したことにより生じたいかなる損害についても、筆者は一切の責任を負いません。